During June & July 2013 we ran our first Digital Animation course at QUAD. The aim was to take students though the animation process to create a short piece. Below are some of the work completed in class.
Friday, 26 July 2013
Tuesday, 23 July 2013
Resources Links - Software, Sounds, Fonts & more
Sound Effects
(Always check the terms of use for the sound effects as you may need to credit the artist)
http://freesound.org/ - Register for a free account, good selection of sounds.
http://www.partnersinrhyme.com/ - no account needed
Fonts
Dafont.com - great selection of fonts and ability to preview text in chosen font
Textures
http://www.textureking.com/
http://www.cgtextures.com/
http://freestocktextures.com/
Software
2D Animation & Effects Software
Adobe After EffectsFor 2D effects and animation.
http://www.adobe.com/uk/products/aftereffects.html
£17 per month for just After Effects CC on the Adobe Cloud subscription
(NB: Look around for earlier versions, for example a kinda "free" version of CS2 here)
Alternatives:
http://www.techshout.com/alternatives/2012/20/after-effects-alternatives/
Adobe Flash Professional
Anime Studio
Imaging Software
http://www.adobe.com/uk/products/photoshop.html
£17 per month for just Photoshop CC on the Adobe Cloud subscription
(NB: Look around for earlier versions, for example a kinda "free" version of CS2 here)
Alternatives: http://sixrevisions.com/graphics-design/10-excellent-open-source-and-free-alternatives-to-photoshop/
Tuesday, 16 July 2013
Creating and Animating Characters Tutorials
Illustrator & After Effects: Vector Based Characters

Adobe Illustrator is great for creating crisp vector designs from scratch for animation. The process is very similar to using a Photoshop document, the below links to the Tuts+ website which is a great resource for a lot of software.
http://vector.tutsplus.com/articles/news/how-to-animate-a-vector-character-in-after-effects-with-aetuts-and-ben-mounsey/
Computer Arts: Animate a character in After Effects

Great step by step guide by Computer Arts, they publish a monthly magazine and their website is full of great tutorials, reviews & features.... http://www.computerarts.co.uk/
Download the PDF tutorial here
After Effects - Working with Audio
Working with Audio in After Effects can be a bit tricky and are you are best to prepare you audio clips before hand in an audio programme such as Audacity (free for PC/MAC), Garage Band (free with MAC), Soundbooth (Adobe) etc.
Import audio files as you would any file by going to File--->Import--->File. It will appear with your other files in the project panel.
Drag your clip onto the timeline and line up with the action.
In order to preview the audio with the images, we have press RAM Preview. Look for the Preview panel (usually on the far right of screen), if you cant see, goto Window--->Preview.

1 - Playback Buttons - First Frame, Back 1 Frame, Play, Forward 1 Frame & Last Frame.
2 - Mute Audio
3 - Loop Options for Previews
4 - RAM PREVIEW - creates a realtime preview including audio. Render time depends on Resolution settings (5) and complexity of content.
5 - Preview Resolution - set to Auto to match current settings or set to a manual option e.g Quarter.
6 - From Current Time - when ticked, the preview will start from the current Play Header position. If un-ticked, preview will start from beginning of composition.
Full Screen - Tick to preview in full screen.
Press (4) RAM Preview whenever you want to see audio and images playing together at real speed!!
Altering the Preview Area
If you want to preview a certain part of the timeline, you can set you IN and OUT points.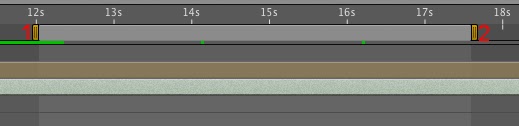
The yellow handles on the Timeline represent the start and end of the preview area. Drag (1) and (2) to set the IN & OUT points. When you now preview, only this area will be previewed.
IMPORTANT: Setting the the IN & OUT points also determines what part of the composition is exported out. So remember to change before creating your final video file.
TIPS
- Open up the drop down options for Audio layer on the timeline to alter the volume and to see the waveforms.
- To just preview audio, press . {full stop key} on the numpad or goto Composition--->Preview--->Audio Preview.
Tuesday, 2 July 2013
After Effects - Animation Guide
From Photoshop to After Effects
- Build a character or scene in Photoshop using layers for separate animatable layers. Be sure to name all layers e.g Head, Upper Arm Right, Lower Arm Right.
- Save your Photoshop composition as PSD file with layers box ticked
- In After Effects, goto the menu File-->Import-->Fie and choose your PSD file. Change Import As box to Composition - Retain Layer Sizes
- Your files is now loaded as a Composition in the Project Bin (far left) and can be opened by double-clicking the file icon.
Animating in After Effects
Keyframes are used to set values at chosen times on the timeline. After Effects computes then animates between the two values. The main things we will use will be Position, Rotation and Scale.
Timeline is where all your layers will be listed vertically and the time running horizontally.

The above image represents the typical timeline in After Effects.
A: Timecode - current time
B: Play-header - click and drag this to move through time
C: Add or remove keyframe by clicking on the diamond. Use the two arrows to jump between keyframes.
D: Activate Keyframes on the selected effect or tool. Only click this once, as clicking again will delete all keyframes create on this tool.
E: Keyframes - you can have as many as needed.
Playback
After Effects needs to render before playing back at real time. Hitting the space bar will begin the render from the current play-header position. A green bar appearing over the rendered area and you can then drag your play-header back to the beginning of the rendered area and press play to view.
Speed up Render Time
 Under your main composition window click on this drop box to lower the playback quality. This will not alter the quality of the animation when exported out but will speed up render time for previewing.
Controlling Speed of Animation
 |
| Keyframes at 10 frame intervals |
The speed of the animate is determined by the distance between any two keyframes. If you set a keyframe at the 1 second mark and the 2nd keyframe at the 5 second mark, the animation will happend over 4 seconds.
To alter the speed, increase or decrease the distance between keyframes by clicking and dragging them on the timeline.
Switching Layers On & Off (Good for blinking)
Using Hold Keyframes stops After Effects animating the change between the keyframes. For instance:
set Opacity to 100% at 1 second mark
set Opacity to 0% at 2 second mark
Opacity will remain at 100% until the it hits the keyframe at 2 seconds and switch to 0%
i.e. you will not see it fade from 100 to 0
This is useful for blinking and flashing lights etc.
Activate Hold Keyframes by right clicking on the required keyframes and select Toggle Hold Keyframe. It will alter the Diamond shape of the keyframe to a square or arrow.
Creating a Loop
Loops are used in animation to save time, for instance with walk cycles. To create a loop, set your keyframes with the first and last keyframe being the same value.
Next with the ALT key held down, press on the Stopwatch of the tool/effect you wanting to loop. This opens up Expressions, which allows for basic coding. In the text box that appears, type the following code and press return/enter key:
loopOut()
Tuesday, 25 June 2013
Tips and Tutorials
Character Design

Computer Arts - Top 40 Character Design Tips

Tutorials on the Complete Process
Daniel Gies' amazing series of video tutorials "From Paper to After Effects" goes into greater detail about creating digital puppets including some great tips for adding textures.
Week 2: Designing Artwork for Animation
How you create your artwork for animation is completely up to you as long as you follow some simple guidelines as stated below. The main thing is to be able to have any animatable elements on their own layer and to always think about scale.
Elements to Create
Begin by making a detailed check-list of all the elements you need to draw for your animation. Go through the script and storyboard writing down what is needed to tell the story. Be economical, think if you can re-use elements from previous scenes by making simple changes e.g. flipping the image, altering the colours.The main elements will include:
Characters
Props
Animated Background Characters or Elements (e.g. clouds, birds)
Static Backgrounds
Traditional Method
If you are more confident drawing by hand or just prefer the style for your animation, then get out your favourite art materials. Use paints, old photos, magazine cuttings, crayon etc.Once you've created your artwork, scan it into the computer at a high resolution (300dpi) or take straight on photographs using a decent camera. You will then load the image into photoshop and prepare as needed.
Characters
For characters we need to be able to separate moveable parts in Adobe Photoshop and the below example is the best way of approaching this. The characters below have been drawn so all the elements are separate and can be layered together. This is similar to how you would create a 2D character for stop-motion too.


Backgrounds
As with the characters, backgrounds can be created by any method including drawing, painting, collage or even just a photograph. The main thing you will have to consider is the ratio you need to work and the scale of objects compared to your character.
The backgrounds can be a flat image or a made up of a series of layers allowing flexibility of layout and easy recycling of artwork.
Ratios
Ratios
Lets talk about ratios and getting it right for animation. By ratio I am referring to the resoultion of the animation we are creating. For example we will be working at 1080p, which is considered Full HD, and has the resolution of 1920×1080 pixels.
 1920x1080 pixels has a ratio of 16:9 widescreen.
When working by hand, it is best to mark out faint 16:9 guidelines on your page. If we break the ratio down, 16 divide by 9 = 1.777, so the width of the rectangle is roughly 1.8 times the height. Therefore you would draw a rectangle that is 180cm x 100cm or 90cm x 50cm etc.
Simply put: the width of the background is 1.8 times the hight.
When creating an image directly in Photoshop, you will need to set the canvas size to 1920x1080 under File & New.
Creating a Background for Panning

You may wish to create panning shots where the camera moves across a wider or taller scene or where a character would walk on the spot and the background would move behind them (see below).
Preparing a Character in Photoshop
A number of programmes are available to allow to create a character and other artworks ready for animation. In class we will be using Adobe Photoshop which is an industry standard programme. For other alternative programes, see the post entitled Software & Tools.
Within Adobe Photoshop you need to work with layers to build up your character. Each movable or replaceable part is to be drawn/designed on a separate layer and named.
Subscribe to:
Posts (Atom)